Oracle APEX and Adobe Sign digital signature integration
Webhooks - Listening and pushing events to your DB
In
the first three parts we learned basics of how to send documents to be digitally signed using Adobe Sign from Oracle APEX applications.
Last piece that we are missing now is something we briefly touched on and that is how do we know that an action on the agreement happen. For example how do we know that users signed their documents or in general acted on your request?
To gives us a head start here, handy little read on Adobe site about webhooks.
The point of it is, we posted couple of REST API calls where in this case we sent documents to our end users to sign, now instead of constantly pinging the remote system about its status, we expect, and this is what Adobe also supports, that it automatically 'pushes' changes back to our database. Basically notifying us about event that happened using webhooks.
This way immediately, when something happens, Adobe web hook will POST its changes based on the event we are listening for to our database and with that to our APEX applications.
Adobe Sign supports two way of doing this and we will look into one of them for simplicity of things.
First way was something we saw earlier with DocuSign too, where we have so called Sign UI graphical user interface to define our web hooks simply by point and clicking.
If you log into your Adobe Sign account from earlier posts on the right there is a Webhook menu option. Here you can create manually your first webhook.
At this point we need to look little bit more into the Adobe webhook documentation to see what is actually needed to pull this of.
So it seems we will need a REST end point that supports both GET and POST requests in order to register a valid end point here. But before we go into our APEX environment and create one we will do a little trick.
There is a special website what can act as if it supports both, it is called webhook.site. This is without having to code a single line of code. If you open the website it will give you the URL we can use on Adobe webhook UI configuration to make things registered.
Of course there are other websites that support similar functionality I leave it up to you to pick you preferred one.
In my case it looked like
Video that helped me here the most is this one.
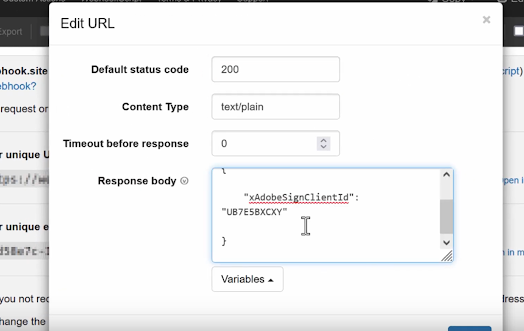
Important part is to edit the GET webhook.site response with appropriate JSON.
Now all we have to do is copy this url which will be unique to you and paste it into configuration bellow
Give your webhook a name and select for which events it will trigger. Save your changes.
Now, here is the strange part. We could have done this the other way around and we could have tried first to go into APEX environment and create REST API with two handlers but for some weird reason I kept getting "The URL provided is not a valid Webhook URL" error. You will see shortly why.
So recommendation is only once we have successfully registered a webhook in Adobe Sign UI we can jump into its APEX implementation.
Webhook.site is cool as it will log all calls made to it for you. It can give you insight into what calls have been made but more importantly what payload they carry which is always handy.
On the APEX end now we know what to do, we need a REST API that looks like
which contains two handlers. Let's look into the GET handler now
Now remember this client_ID as we will have to hardcode it to make Adobe sign UI happy with it.
For some strange reason, if it is implemented as above, during webhook creation process, it triggers that not a valid Webhook URL message. Question is why?
Where do we find this clientID? It seems this needs to be exactly Adobe Acrobat Sign Web UI client ID (UB7E5BXCXY) and no other.
Even tough in the documentation it says "Replace 'clientID' with the client ID of the application using which the webhook is created"; which I would translate as go under your account application settings find its Application ID and use this as Client Id. But no, this doesn't seem to work and it raises errors.
This would make sense as I could use this clientId then as a secret that can be checked on DB end if the it maps before continuing the process.
If you have figured this part out please let me know I would love to know what I was missing. For now this should be all.
After we complete the POST handler we will come back to this step as we will briefly need to replace this l_client_ID. You can also leave it hard coded from start.
We sorted the GET method, now we can look into how do we process webhook POST process that is the key one in the whole story.
We will create another handler similar to
In webhook overview it states: "Every webhook needs to be responded with xAdobeSignClientId in the body or x-AdobeSign-ClientId in HTTP header" so make sure that you add this bit at the end of you POST procedure.
htp.p('{
"xAdobeSignClientId":
"' || l_client_ID || '"
}');
Before we go back to the app to test this, jump to GET handler hard code your clientID if you haven't already; click apply changes; Copy the REST URL and update your webhook URL with it; once it is happy put back l_client_ID as in original REST code above for the GET handler.
It even requires a JSON to have this specific format, if I remember correctly.
GET JSON response for my handler was basically this
{
"xAdobeSignClientId":"UB...BXCXY"
}
With this we should be done configuring our webhook.
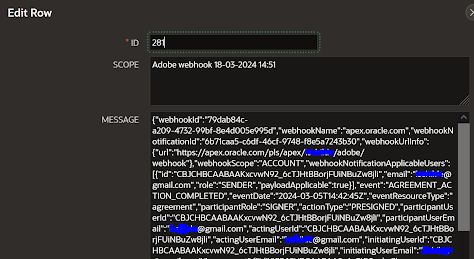
If we now click on create agreement button from app we created in steps one and two, we should start seeing POST requests being registered against DB table.
These would be corresponding to events triggered by signatures and actions of the end users on documents sent to them.
Of course, which action depends on which one we registered for while we were creating the webhooks in Adobe Sign admin UI.
One thing to surely be aware of - the same webhhoks will/can trigger multiple times, so if your processing depends on it make sure to cater for multiple events of the same payload. This may happen if your POST REST handler does not return client ID as successful webhook notification back to ADOBE.
At this point this is where the actual work begins, processing payloads posted by all of these webhooks in PL/SQL.
There is of course more to this, as webhooks can be creating using the REST API directly but that is for another day.
Happy APEXing,
Lino


No comments:
Post a Comment