Tuesday, 22 July 2025

ORACLE APEX IG/IR removing leading trailing spaces before searching


ORACLE APEX IG/IR removing leading trailing spaces before searching

Trimming your copy and paste search inputs

One of these requests landed on my to do list the other day. 

Brief was can I help when users copy and paste their inputs into Interactive reports/Interactive Grids search boxes to trim leading and trailing spaces. 

Very often your end users like to copy and paste inputs into APEX applications. 

Problem with this and most of us using web apps will know this beforehand we would copy and paste into text editor first then copy it again into desired search fields. 

Reason why we tend to do this is to avoid having issues caused with having to carry empty spaces when you copy the original text. 

How can we do this on application level so we do not have to do this on every page where reports are there. Of course we can look into Dynamic Actions and JavaScript 

On the page 0 page add this On page load JavaScript: 

function trimSearchInput() {
   $('.a-IRR-search-field, .a-IG .a-Toolbar-input').on('paste', function(e)
   {
     e.preventDefault();
     var myInput = e.originalEvent.clipboardData.getData('text');
     var firstChar = myInput.substr(0, 1);
     apex.debug.info(myInput);
     //only if input has trailing or leading white space
     if (myInput !== $.trim(myInput) ) {
       if (firstChar === '^') {
          // Do something if the input starts with '^'
          apex.debug.log("The a-IRR/IG-search-field input value starts with '^'.");
          this.value = myInput.substr(1);
       }
       else {
            apex.debug.log("Trimming the a-IRR/IG-search-field input value."); 
            this.value = $.trim(myInput);
       }
      }   
    }); 
}

//Try executing when theme is ready
apex.jQuery(window).on('theme42ready', function() {
  //apex.debug.log('Do a-IRR-search-field after UI elements are rendered on the page.');  

  setTimeout(function() {
     trimSearchInput();
   },1000);
});

//for slower internet connections 1second is not enough to load the page so setting a timer to wait until it loads
function waitForElement(selector, callback) {
    var interval = setInterval(function() {
        if ($(selector).length) {
            clearInterval(interval);
            callback($(selector)); // Pass the found element to the callback
        }
    }, 100); // Check every 100 milliseconds
}

// Example usage:
waitForElement('.a-IRR-pagination', function(element) {
    console.log('Element exists:', element);
    // Perform actions on the element here
    trimSearchInput();
});

// Example usage:
waitForElement('.a-IG .a-Toolbar-input', function(element) {
    console.log('Element exists:', element);
    // Perform actions on the element here
    trimSearchInput();
});
This can be fine tuned for other use cases. To stay within the box I added a special sign '^' which if it prefixes your input it will keep the paste content unchanged. 

Happy APEXing,

SLino

Tuesday, 11 February 2025

ORACLE APEX Security - APEX SERT 24.2

ORACLE APEX Security - APEX SERT 24.2

Free security scanning tool for Oracle APEX 24.2

Just a note that APEX SERT for Oracle APEX 24.2 is available for download.

It is that time of the year. ;)

Install, share, secure your apps and provide feedback ;)

Happy APEXing,

SLino

Tuesday, 19 November 2024

Oracle APEX and Adobe Sign digital signature integration - part 4


Oracle APEX and Adobe Sign digital signature integration

Webhooks - Listening and pushing events to your DB


In the first three parts we learned basics of how to send documents to be digitally signed using Adobe Sign from Oracle APEX applications.

Last piece that we are missing now is something we briefly touched on and that is how do we know that an action on the agreement happen. For example how do we know that users signed their documents or in general acted on your request?

To gives us a head start here, handy little read on Adobe site about webhooks. 

The point of it is, we posted couple of REST API calls where in this case we sent documents to our end users to sign, now instead of constantly pinging the remote system about its status, we expect, and this is what Adobe also supports, that it automatically 'pushes' changes back to our database. Basically notifying us about event that happened using webhooks.

This way immediately, when something happens, Adobe web hook will POST its changes based on the event we are listening for to our database and with that to our APEX applications. 

Adobe Sign supports two way of doing this and we will look into one of them for simplicity of things.

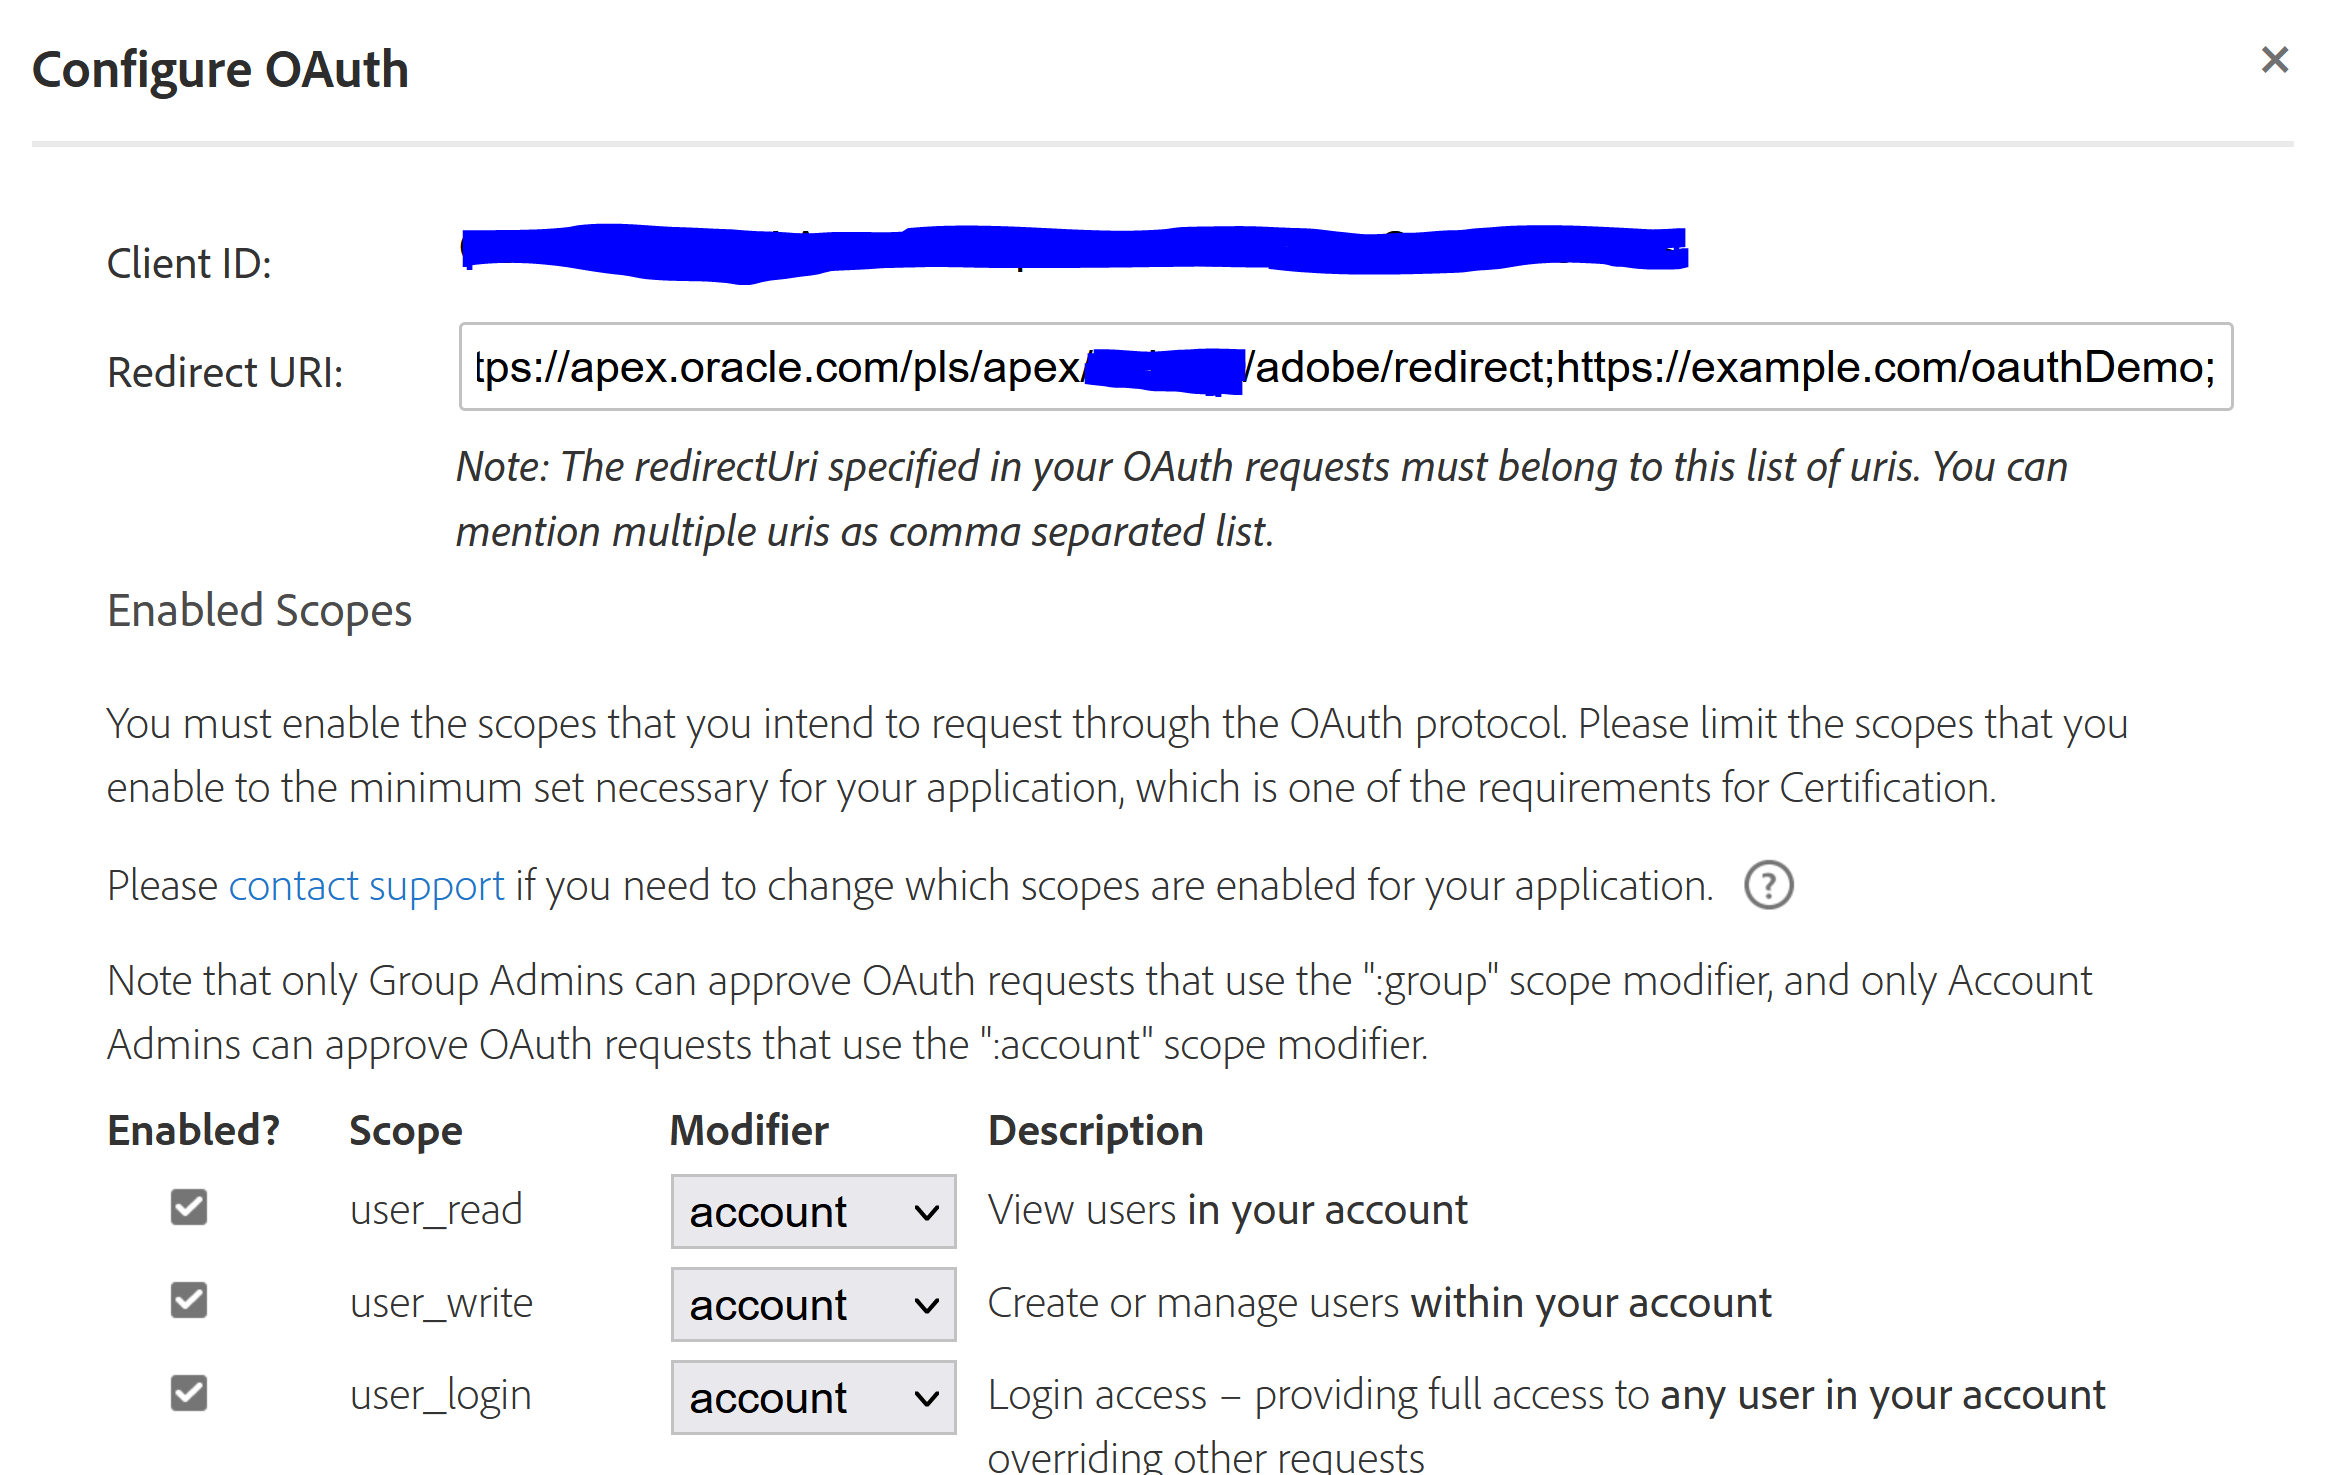
First way was something we saw earlier with DocuSign too, where we have so called Sign UI graphical user interface to define our web hooks simply by point and clicking. 

If you log into your Adobe Sign account from earlier posts on the right there is a Webhook menu option. Here you can create manually your first webhook.

At this point we need to look little bit more into the Adobe webhook documentation to see what is actually needed to pull this of.

So it seems we will need a REST end point that supports both GET and POST requests in order to register a valid end point here. But before we go into our APEX environment and create one we will do a little trick. 

There is a special website what can act as if it supports both, it is called webhook.site. This is without having to code a single line of code. If you open the website it will give you the URL we can use on Adobe webhook UI configuration to make things registered. 
 
Of course there are other websites that support similar functionality I leave it up to you to pick you preferred one. 
 
In my case it looked like
 
Video that helped me here the most is this one
 
Important part is to edit the GET webhook.site response with appropriate JSON. 
Now all we have to do is copy this url which will be unique to you and paste it into configuration bellow
Give your webhook a name and select for which events it will trigger. Save your changes.
 
Now, here is the strange part. We could have done this the other way around and we could have tried first to go into APEX environment and create REST API with two handlers but for some weird reason I kept getting "The URL provided is not a valid Webhook URL" error. You will see shortly why.
So recommendation is only once we have successfully registered a webhook in Adobe Sign UI we can jump into its APEX implementation.

Webhook.site is cool as it will log all calls made to it for you. It can give you insight into what calls have been made but more importantly what payload they carry which is always handy.
 
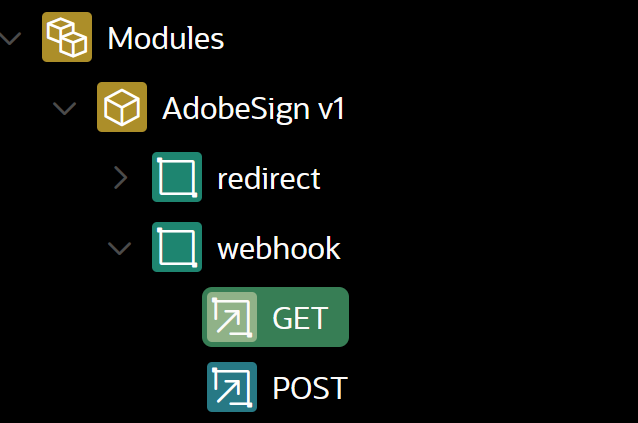
On the APEX end now we know what to do, we need a REST API that looks like 
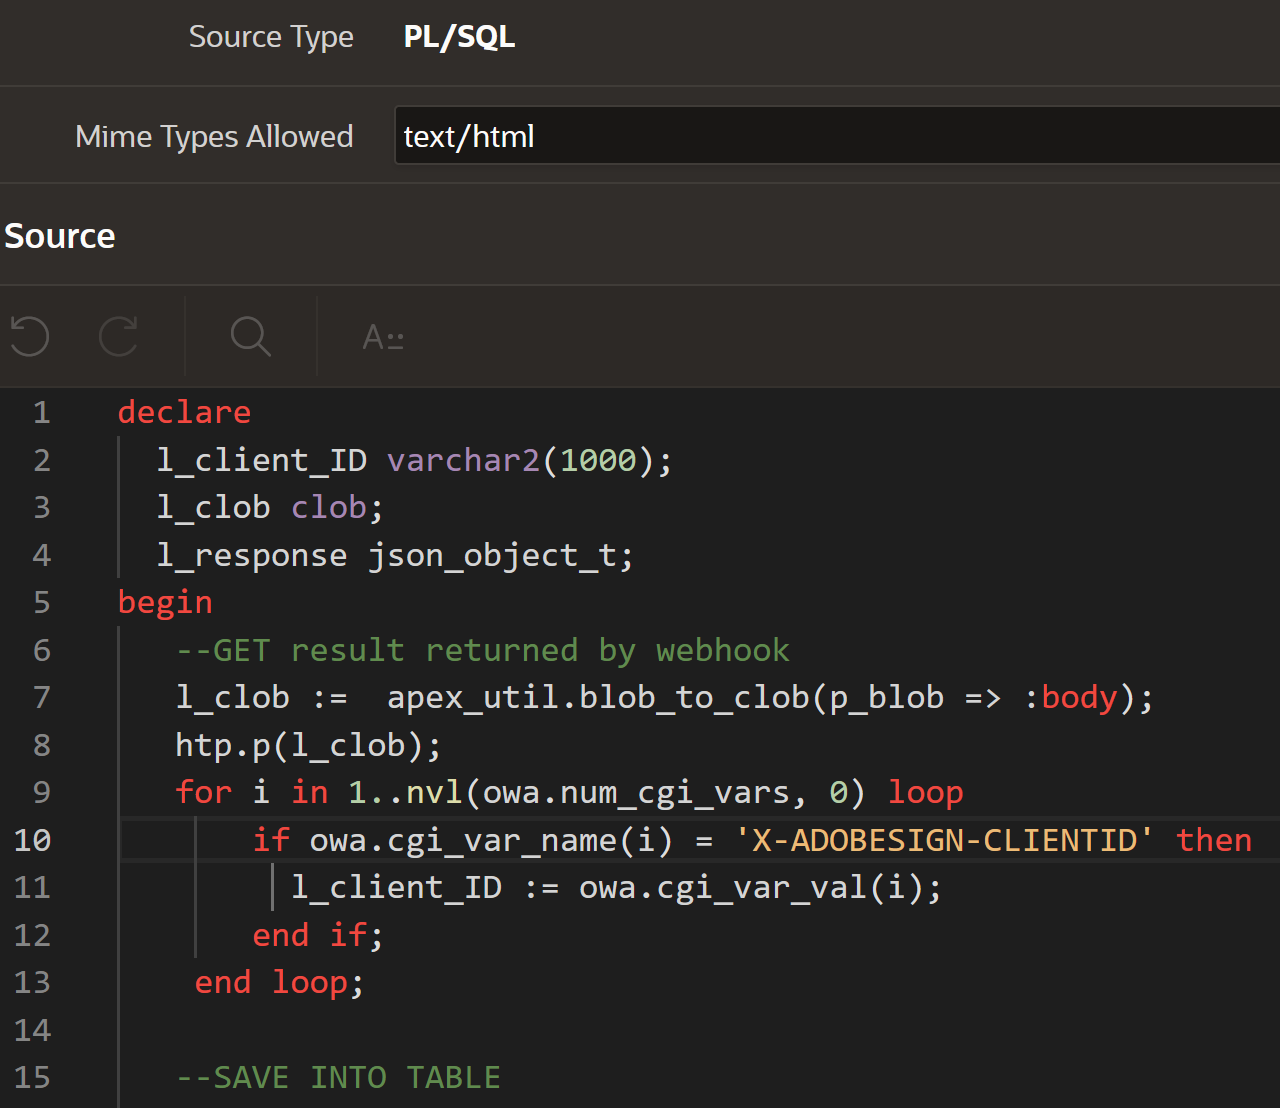
which contains two handlers. Let's look into the GET handler now

Now remember this client_ID as we will have to hardcode it to make Adobe sign UI happy with it. 

For some strange reason, if it is implemented as above, during webhook creation process, it triggers that not a valid Webhook URL message. Question is why? 
 
Where do we find this clientID? It seems this needs to be exactly Adobe Acrobat Sign Web UI client ID (UB7E5BXCXY) and no other. 
 
Even tough in the documentation it says "Replace 'clientID' with the client ID of the application using which the webhook is created"; which I would translate as go under your account application settings find its Application ID and use this as Client Id. But no, this doesn't seem to work and it raises errors. 
 
This would make sense as I could use this clientId then as a secret that can be checked on DB end if the it maps before continuing the process.
 
If you have figured this part out please let me know I would love to know what I was missing. For now this should be all. 
 
After we complete the POST handler we will come back to this step as we will briefly need to replace this l_client_ID. You can also leave it hard coded from start.

We sorted the GET method, now we can look into how do we process webhook POST process that is the key one in the whole story. 
 
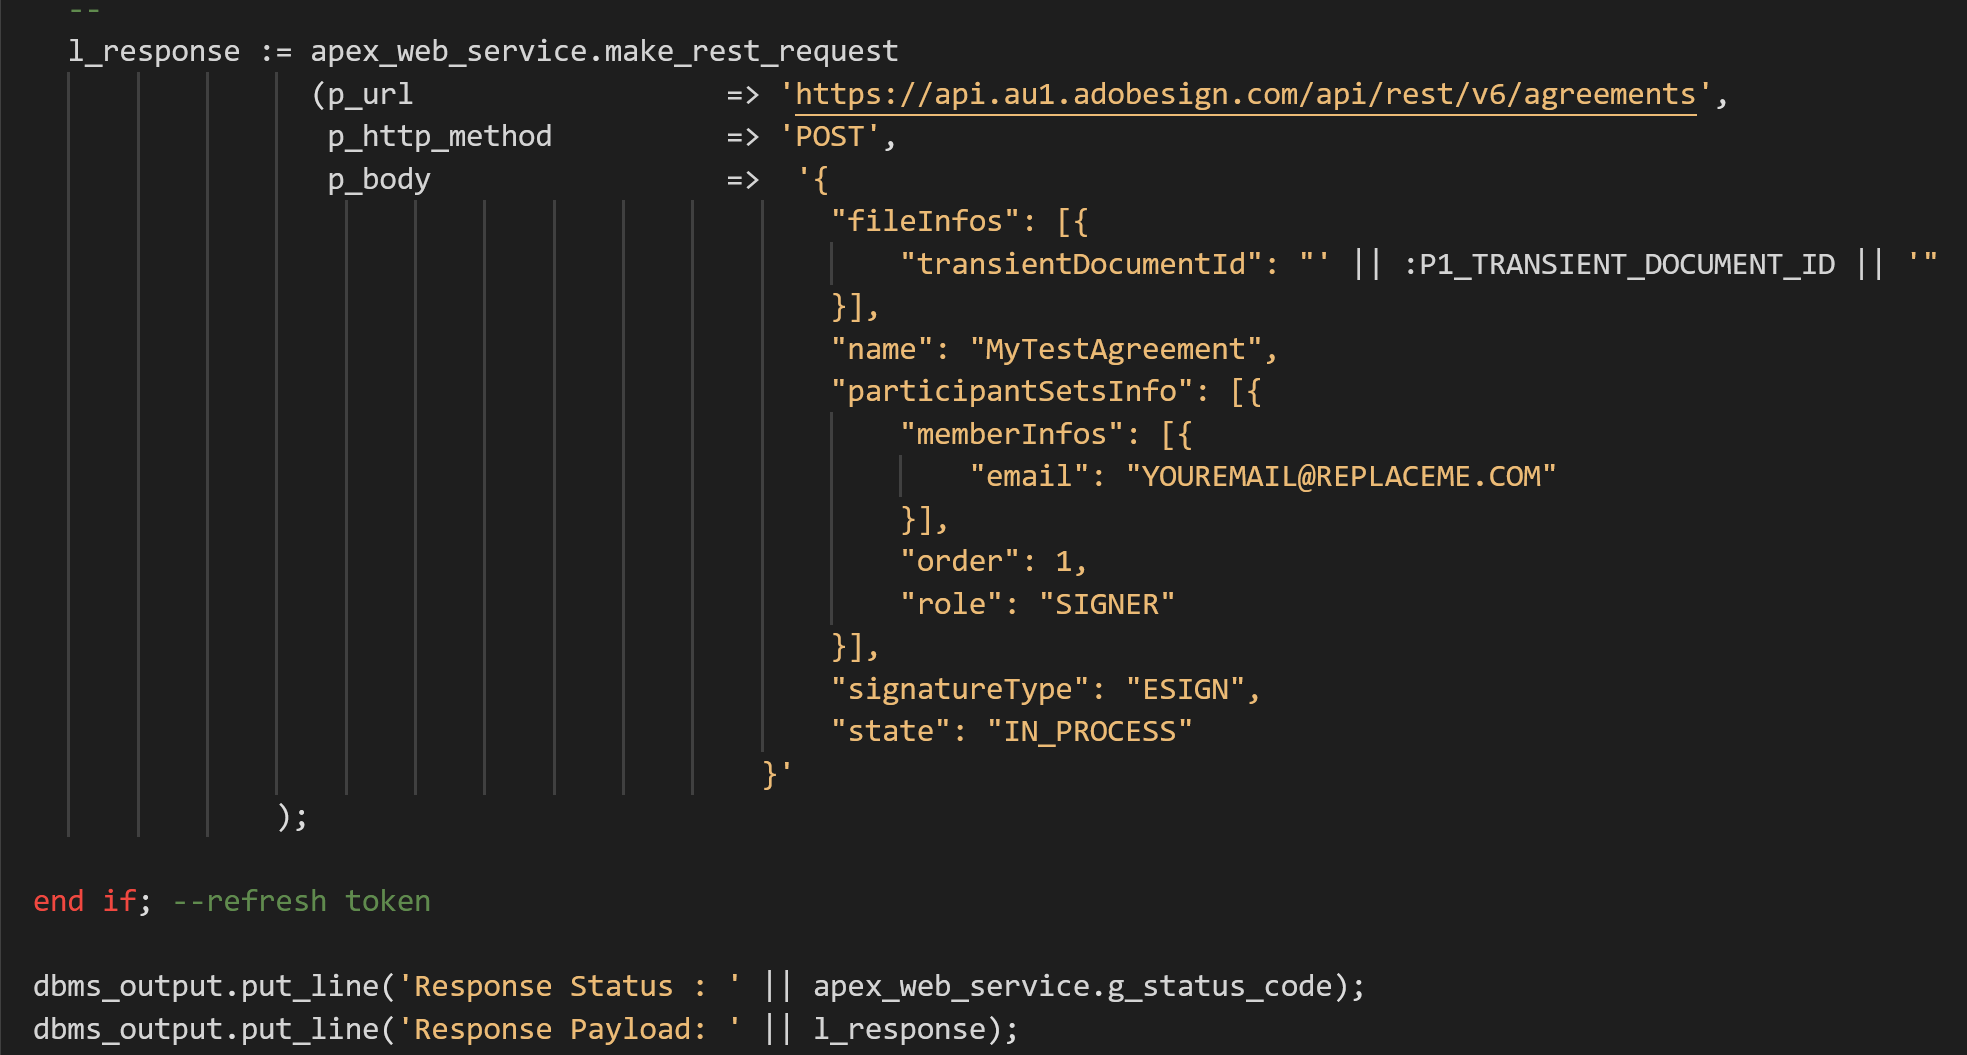
We will create another handler similar to 
 
In webhook overview it states: "Every webhook needs to be responded with xAdobeSignClientId in the body or x-AdobeSign-ClientId in HTTP header" so make sure that you add this bit at the end of you POST procedure.
htp.p('{

   "xAdobeSignClientId":
"' || l_client_ID || '"

}');
Before we go back to the app to test this, jump to GET handler hard code your clientID if you haven't already; click apply changes; Copy the REST URL and update your webhook URL with it; once it is happy put back l_client_ID as in original REST code above for the GET handler. 
 
It even requires a JSON to have this specific format, if I remember correctly.
GET JSON response for my handler was basically this
{

   "xAdobeSignClientId":"
UB...BXCXY"

}
With this we should be done configuring our webhook. 
 
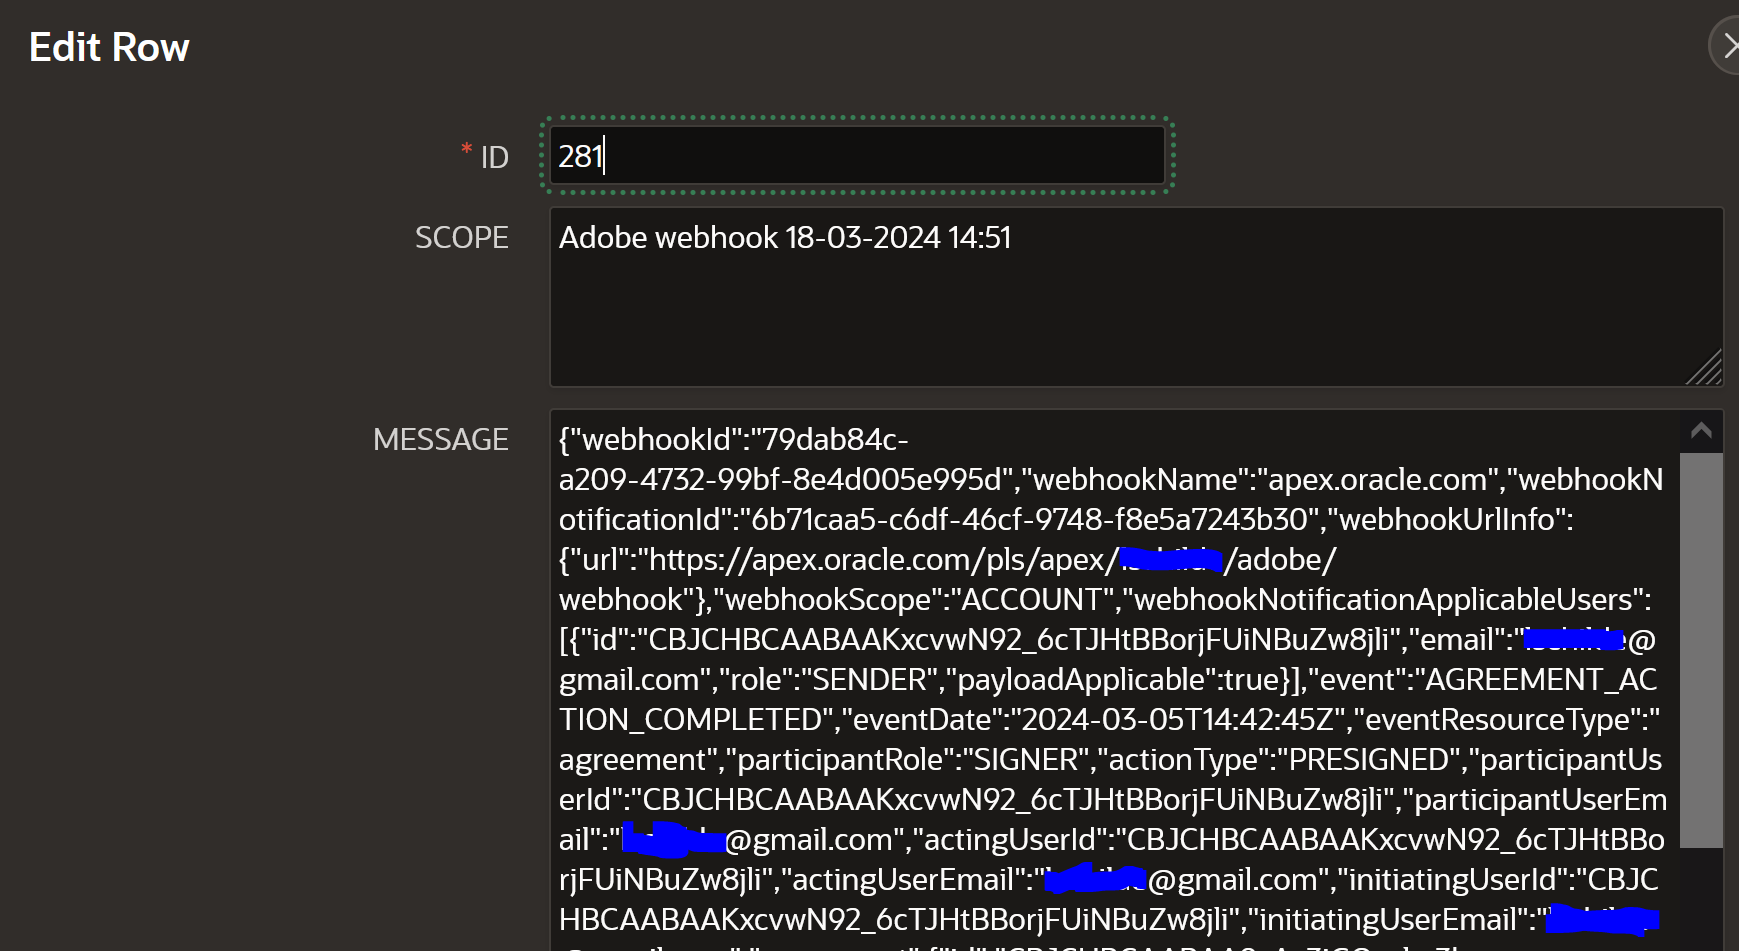
If we now click on create agreement button from app we created in steps one and two, we should start seeing POST requests being registered against DB table. 
 
These would be corresponding to events triggered by signatures and actions of the end users on documents sent to them. 
 
Of course, which action depends on which one we registered for while we were creating the webhooks in Adobe Sign admin UI.
One thing to surely be aware of - the same webhhoks will/can trigger multiple times, so if your processing depends on it make sure to cater for multiple events of the same payload. This may happen if your POST REST handler does not return client ID as successful webhook notification back to ADOBE. 


At this point this is where the actual work begins, processing payloads posted by all of these webhooks in PL/SQL. 

There is of course more to this, as webhooks can be creating using the REST API directly but that is for another day.

Happy APEXing,
 
Lino


Monday, 2 September 2024

ORACLE APEX Security - APEX SERT 24.1


ORACLE APEX Security - APEX SERT 24.1

Free security scanning tool for Oracle APEX

Just a note that APEX SERT for Oracle APEX 24.1 is available for download.

Better late than never ;)

Install, share, secure your apps and provide feedback ;)

Happy APEXing,

SLino

Saturday, 20 April 2024

ORACLE APEX Security - APEX SERT 23.2


ORACLE APEX Security - APEX SERT 23.2

Free security scanning tool for Oracle APEX

Just a note that APEX SERT for APEX 23.2 is available for download.

Anyone who is on APEX 23.2 this is the correct SERT version to be on.

Install, share and provide feedback ;)

Happy APEXing,

SLino


Sunday, 17 March 2024

Oracle APEX and Adobe Sign integration - part 3


Oracle APEX and Adobe Sign electronic signature integration

Retrieving the access Token


In the first two parts we learned how we can let end users authorize your APEX app to send request to Adobe which resulted in code being returned to us. This was then used as a token to retrieve access and refresh tokens which we will be using going forward.

Before we proceed further at this stage we need a document that we want people to sign. If you are already on AOP this would be the place and time to generate the document perhaps store it in a table so that we can send it to Adobe API.

How you generate your document is irrelevant for this post. What I have done is simply found one document uploaded it into a table and I will use this blob column as a document in my calls. 

select output_blob into l_file_blob from doc_output where filename = 'output.pdf';

From Adobe perspective first step is to upload this document into 'temporary storage' using 

https://api.au1.adobesign.com/api/rest/v6/transientDocuments

There are few interesting pieces to this API so let's look into PL/SQL side. According to the documentation there are three parameters we need to send in. 

Authorization - Bearer token which will hold out newly retrieved access token from part 2

File-Name - passed as text in REST body  

File - actual .pdf content

The PLSQL call could be something like

And response will be in this format

{transientDocumentId (string): The unique identifier of the uploaded document that can be used in an agreement or a bulk send or web form creation call}

What there is to know about this transient document in Adobe, well it is a temporary place where document will be kept only for couple of days before being removed. 
 
Once we retrieve the transientDocumentId we can finally send document to be signed using /agreements API
https://api.au1.adobesign.com/api/rest/v6/agreements

Put in PLSQL call as


What we are doing actually, in Adobe, is creating an agreement. Why is this? Look at it as part of how this Adobe workflow works.
 
It would result in people receiving an email with a request to sign the document. 

User would click on the email received, sign the document 


After it the requester would receive an email that it has been signed and end user would also receive an email with a chance to download the final file.
Downloaded document...

Of course there is lots more to it now, like for example multiple signatures or how do we know on database side that this event happened or what is the status of the document and many more APIs to explore. 

If you followed posts about DocuSign we talked more about web-hooks and how it works but this is a story for another time.
 
Happy APEXing,
Lino


Friday, 15 March 2024

Oracle APEX and Adobe Sign integration - part 2


Oracle APEX and Adobe Sign electronic signature integration

Retrieving the access Token


Now that we have verified that our ORDS REST redirect call is functioning as expected we need to try doing the same using the full Adobe OAuth process.

Again the simplest way is add another button called Request authorization to your page which will be submitting the page or redirecting to URL should work too. 

Add a post processing branch that redirects to 

https://secure.au1.adobesign.com/public/oauth/v2?redirect_uri=https%3A%2F%2Fapex.oracle.com%2Fpls%2Fapex%2FYOURREST%2Fadobe%2Fredirect

&response_type=code

&client_id=&YOUR_CLIENT_ID.

&state=&APP_SESSION.

&scope=user_read:self+user_write:self+user_login:self+agreement_read:self+agreement_write:self+agreement_send:self+widget_read:self+widget_write:self+library_read:self+library_write:self+workflow_read:self+workflow_write:self

Make sure you replace client ID with your client ID and that redirect URI matches URI you used in Adobe application settings under configure OAuth up to the ../redirect part. 


Only once you updated your Adobe settings will things start to work. Scope parameter is more explained on Adobe site. I simply added all of them.
 
Now add a page item called CODE which will store the value of the code that is sent back to APEX from Adobe once user has accepted and allowed APEX to access their details. 

Run your page and click on Request Authorization button. you should be redirected to Adobe login; redirected back and landed on the same page with page item Code now containing information we need to provide to finally retrieve an Access Token.
 

At this stage we are back to the place which we are familiar with, it only comes down to calling and consuming Adobe REST APIs using apex_web_service API.
 
One last thing to remember is that Code returned by Adobe is only valid for next 5 minutes. So let's get going onto the next important part and that is getting the access token.
 
Let's create another button called Access token, that will submit the page and execute Get Adobe Access token process with this PLSQL.

Create an PXX_ACCESS_TOKEN page item. Run the page. If your code has expired you might have to rerun the process from step 1 before clicking on the new button. 

Important to note is that adobe redirects people based on the location to different urls, I had to use https://api.au1.adobesign.com you need to replace yours to one that maps to your location.

This REST API will result in JSON response like 
{
   "access_token":"3AAABLblThIsIsNoTaReAlToKeNPr6Cv8KcZ9p7E93k2Tf",
   "refresh_token":"3AAABLblThIsIsNoTaReAlToKeNWsLa2ZBVpD0uc*",
   "token_type":"Bearer",
   "expires_in":3600,
   "api_access_point ":"https://api.na1.adobesign.com/",
   "web_access_point":" https://secure.na1.adobesign.com/"
}
and at this stage there is an important information we need to store going forward. This is a refresh token. Why? 
 
Refresh token has a life span of 60 days meaning instead of repeating this process from scratch we can use refresh token to later on request a new access token which is used as Bearer token in next API calls. 

Just an FYI, refresh token can be sent in a call as

l_response := apex_web_service.make_rest_request 
(p_url => 'https://api.XX1.adobesign.com/oauth/v2/refresh',
 p_http_method  => 'POST',
 p_body =>  'grant_type=refresh_token'
         || '&refresh_token=' || :PX_REFRESH_TOKEN
         || '&client_id=' || l_client_id
         || '&client_secret=' || l_client_secret
      );

So if Access token is expired we can use refresh token to retrieve a new access token. Each time refresh token is utilized it extends its validity for another 60 days. In ideal world this might mean that if user uses the app on regular bases request authorization process might not ever be needed again.
 
Now we are ready to start uploading our first document.

 
Happy APEXing,
Lino